How to Compress Images Without Losing Quality: A Complete Guide
You have just taken the perfect photo for your blog, and it is 8 MB. Your website crawls, your email bounces, and the job application form says “maximum 100 KB.” Oversized images are one of the most common everyday headaches, and one of the easiest to fix.
A good image compressor can shrink most photos dramatically while keeping them looking sharp to the human eye. In this guide, we explain how image compression works, which settings to use, and how to compress images online for websites, forms and email without ruining them.
Why Image Size Matters
Every extra megabyte your visitors download costs them time and data. For website owners, slow pages also affect user experience, and Google has said that Core Web Vitals, which include loading speed, are used by its ranking systems. Large images are often the biggest reason a page feels slow.
Smaller images also help in everyday situations:
- Websites and blogs: faster loading, especially on mobile data
- Email: attachments that actually go through
- Application forms: many job and exam portals ask for photos under a fixed size, such as 100 KB or 50 KB
- Storage: less space used on your phone, drive or server
Lossy vs. Lossless Compression: What’s the Difference?
Before choosing a setting, it helps to know the two types of compression.
Lossless compression removes hidden data such as metadata and unused colour profiles, so the image looks identical but the file is a little smaller.
Lossy compression goes further. It simplifies areas of the picture where your eye is least likely to notice a change. A blue sky does not need dozens of slightly different shades of blue, so a smaller set looks the same to most people.
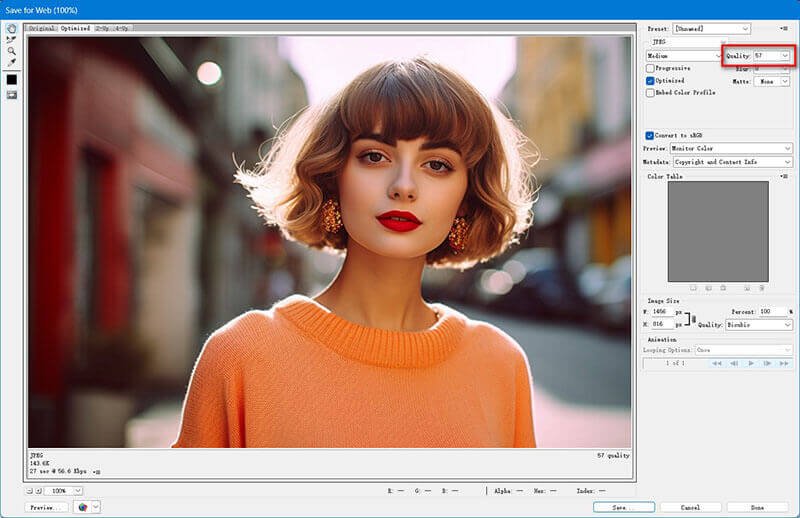
JPG is a lossy format, so compressing a photo to JPG always discards some detail. The honest answer to “can I compress images without losing quality?” is this: you cannot avoid all loss with JPG, but at the right settings the loss is very hard to see.
What Quality Setting Should You Use?
There is no single perfect number, but these ranges are a reliable starting point:
| Quality setting | What to expect |
| 80–90% | Loss is very hard to see in photos; file is still much smaller |
| 70–80% | Usually looks close to the original at a much smaller size |
| Below about 50% | You may see blocky patches in skies and smooth gradients |
For most web images, 70 to 85 percent is the sweet spot. It gives a big reduction in file size without visible damage. Always look at the result before you publish.
How to Compress Images Online (Step by Step)
Here is the quick method using Alventra’s free Image Compressor:
- Drop your images into the tool or click to choose them. You can add one image or many at once.
- Move the quality slider. 70 to 80 percent is a good place to start.
- Compare the sizes. Each file shows its original size, new size and the percentage saved.
- Download your compressed images.
It accepts JPG, PNG and WebP files. There is no sign-up, and everything is processed in your browser, so your private photos and documents never leave your device.
Four Techniques to Reduce Image Size Without Ruining Quality
1. Resize before you compress
This is the most common mistake. A 4000-pixel-wide photo that will only be displayed at 800 pixels will stay heavy no matter how hard you compress it. Bring the pixel dimensions down first with an Image Resizer, then compress. Resize first, compress second.
2. Crop out what you do not need
Removing empty edges or background reduces the number of pixels, which reduces the file size too. An Image Cropper lets you trim a photo visually and download it instantly.
3. Pick the right format
- JPG is best for photographs and images with lots of colours
- PNG suits logos, screenshots and graphics with sharp text or transparency
- WebP usually gives smaller files at similar quality, which makes it popular for websites
If you are unsure, an Image Format Converter lets you convert between PNG, JPG, WebP and BMP and compare the results. For a deeper look at WebP, read the WebP conversion guide.
4. Compress in batches
If you have a whole gallery to optimize, doing images one by one is painful. Alventra’s compressor lets you add as many images as you like and applies your chosen quality to each one.
How to Compress an Image to 100 KB, 50 KB or 20 KB
Many application forms demand very small files. Here is a simple approach:
- Add the image to the compressor.
- Lower the quality slider until the compressed size shown is under your target.
- For 100 KB: phone photos often get there at around 50 to 70 percent quality.
- For 50 KB or 20 KB: first make the image smaller with the Image Resizer, for example 600 to 800 pixels wide, then compress it.
- Download the result and check that it still looks clear.
If a form rejects the file, shrink the pixel dimensions a little more rather than pushing the quality extremely low.
Things to Know Before You Compress
- The output is JPG. Alventra’s compressor accepts JPG, PNG and WebP, and saves every result as a JPG, which gives the smallest files for photos.
- Transparency is lost. JPG has no transparency, so transparent parts of a PNG turn white. If you need to keep transparency, use the Image Format Converter and save as PNG or WebP instead.
- Already-small images may not shrink much. If the saving is tiny, the image was probably already compressed, so keep the original.
Check the Result Before You Publish
Compression is a trade-off, so look before you ship:
- Compare file sizes between the original and the compressed version.
- Zoom in to 100 to 200 percent and look at edges, skin tones and smooth gradients like skies. These are where artefacts show up first.
- Test the real page. If the image is going on a website, run the page through PageSpeed Insights before and after to see the difference in loading performance.
Quick Checklist
- Choose the right format for the job
- Resize to the dimensions you actually need
- Compress at 70 to 85 percent quality for web use
- Check the result at full size before using it
- Keep your original file as a backup
Frequently Asked Questions
Can I compress an image without losing quality?
Not completely with JPG, which always discards some detail. At 80 to 90 percent quality the loss is very hard to see in photos while the file is still much smaller. For a truly lossless result, reduce the pixel dimensions with an image resizer, or save graphics as PNG.
Does image compression reduce quality?
Yes, slightly, because JPG is a lossy format. Above about 70 percent the change is hard to see in most photos. Lower settings give smaller files but can show blocky artefacts in gradients and fine detail.
Which formats can I compress?
You can add JPG, PNG and WebP images. Every result is saved as a JPG.
Can I compress several images at once?
Yes. Add as many as you like, and each is compressed at the quality you set.
Are my images uploaded to a server?
No. Compression happens in your browser, so your files stay on your device.
Is the image compressor free?
Yes. It is free to use, with no sign-up required.
Conclusion
Compressing images does not have to be complicated. Resize to the dimensions you need, choose a quality setting around 70 to 85 percent, and check the result before you use it. Do that, and you will cut file sizes dramatically without anyone noticing a difference.
Ready to try it? Open Alventra’s free Image Compressor, add your photos and download smaller files in seconds. You can also explore more utilities in the Image Tools category.